How to Crochet a Magic Ring (Magic Loop) – Photo & Video Tutorial
What Is a Magic Ring in Crochet? A Beginner’s Guide with Tips and Tutorials
If you’re wondering how to make a magic ring in crochet, you’ll find everything you need in this guide. The magic ring (also called a magic circle/ magic loop) is an essential crochet technique, especially for amigurumi, granny squares, coasters, and other circular crochet projects.
Unlike starting with a chain and joining it into a loop, a magic ring allows you to create a tightly closed center with no visible hole. This gives your crochet projects a cleaner, more professional finish.
For beginners, the magic ring can seem a little intimidating at first. However, once you understand the basic steps and practice a few times, it becomes a quick and easy technique that you’ll use again and again.
In this tutorial, you’ll learn how to make a crochet magic ring step by step with photos and a video guide to help you follow along.
💡 Tip: Don’t worry if you don’t get it right on your first try. Like any crochet skill, the magic ring becomes much easier with practice.
Tips and Common Mistakes
Avoid Pulling the Ring Too Tight
If you tighten the magic ring too much, it can become difficult to work your next stitches into the ring.
Don’t Leave the Ring Too Loose
Pulling the ring too loosely may leave a visible hole in the center of your project, which defeats one of the main benefits of using a magic ring.
Practice Makes Perfect
Most crocheters need a few attempts before the technique feels natural. Don’t be discouraged if your first magic ring isn’t perfect.
Special Tip for Amigurumi
When making amigurumi, be careful not to pull the ring excessively tight. Over-tightening can make stuffing and shaping your finished piece more difficult.
With a little practice, the crochet magic ring will become one of your favorite techniques for starting beautiful, seamless crochet projects.
Let’s Make a Magic Ring Together ✨ Step-by-Step Crochet Guide
If you learn better by watching, you can follow along with my YouTube video tutorial by clicking here. With detailed, step-by-step explanations and voice instructions, you’ll be able to create the magic ring easily and confidently.
Where Do We Use the Magic Ring?
The magic ring (magic circle) technique is widely used in many crochet projects, especially circular designs. It helps create a tight and neat center with no hole, making your work look more professional.
You can use the magic ring for:
- Amigurumi dolls and animals 🧸
- Round coasters and drink mats ☕
- Crochet flowers and decorative motifs 🌸
In amigurumi projects especially, the magic ring ensures a closed, tight starting point that looks clean when stuffed and finished.
Example Project Idea 🎄
One of my recent projects was a cute Crochet Flower Coasters. We also started that design with a magic ring technique. If you would like to make it, you can find the pattern by clicking here.
Step-by-Step Magic Ring Tutorial
In this guide, you will learn how to make a crochet magic ring step by step. Follow the instructions carefully and practice slowly at first.
With a little practice, this technique will become one of the easiest and most useful methods in your crochet journey. It is a must-have skill for anyone who loves amigurumi and circular crochet designs.
✨ Once you master the magic ring, your crochet projects will look cleaner, tighter, and much more professional.
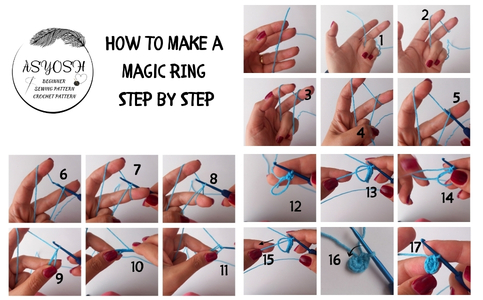
Step-by-Step Magic Ring (Crochet) Instructions 🧶✨
- Step 1: Hold the yarn with your left hand.
- Step 2: Hold it with your ring finger and little finger.
- Step 3: Wrap the yarn around your index finger. This helps keep the yarn steady.
- Step 4: Wrap it in an “X” shape around your middle finger.
- Step 5: Hold the yarn tail with your thumb.
- Step 6: Insert your hook under the yarn.
- Step 7: Yarn over and pull the loop through.
- Step 8: Make 1 chain stitch.
- Step 9: While removing the yarn from your middle finger, hold it firmly with your thumb.
- Step 10: Insert the hook into the center of the ring.
- Step 11: Yarn over and pull it through the ring.
- Step 12: Make a single crochet stitch.
- Step 13: Make 6 single crochet stitches in total.
- Step 14: Hold the yarn tail of the magic ring.
- Step 15: Pull the yarn tail to close the ring.
- Step 16: The magic ring is now closed.
- Step 17: Finish the first round with a slip stitch.
✨ Your crochet magic ring is complete and ready for the next round!